
|
ExcoLight Basic, the Exceptionally Complicated light. A bus-capable PWM LED driver.
Features:
The layout, as available here, could have been smaller (SSOP, 0805, 0603), but at least the LED, which is the one and only component fitted on the solder side, needed some copper as a cooling area. And, this way, it's easy to solder too... Cables can directly be attached to pluggable screw terminals, but the PCB can also be used as a module itself (terminals, with attaches cables, fitted elsewhere...). Here's a video, straight from the lab ;-)
Hardware
As presented here, the hardware should be a fair compromise between cost and component count/complexity. Although the hardware got (a little ;-) more complex than planned, the selected parts are cheap (<<0.2€), except for the LED (2-15€), the PCB (2-5€), a PIC (0.5-1€), several Cs (0.5-1.5€) and a coil (0.3-0.8€). The main part of the circuit is a PIC 16HV616. The "HV-devices" contain an integrated current sink at the Vdd pin and can therefore be attached to high voltages via a single resistor. The internal sink will lower the voltage to ~5V. This is simple, but not very efficient. Usually, the current consumption of the HV-PIC's sink (1-4mA), leads to a loss of 10-30% in efficiency, compared to the LED current (0-400mA).
Notice that the module's current consumption on the bus, is a fraction of the real LED current (~350mA*4V/24V; @100% eff.)
while the PIC current stays the same (~3-4mA, no load)... The PIC can handle a PWM up to a frequency of 200kHz, at only 5 bit resolution. A free running oscillator could go much faster, helping to reduce the size and cost of the inductor, but none of the "unusual" or non-standard topologies provided the demanded feature set (true LED-current programmability, low ripple, stability/safety, ...). At the end, the standard current regulated buck-topology won. The chosen design makes use of some sophisticated "PIC-only" features (although these days, Microchip is not the only company that built in analog components).
Circuit Description
With power coming in from D1 (can be omitted if you are ABSOLUTELY sure you will never ever reverse + and -),
the buck regulator is formed by T1, D2 and L1. Two multi pads for the buffering capacitors C2 (input)
and C1 (output) allow placement of 1206 ceramic, several tantalum and electrolytic capacitors (6mm diameter),
depending on component height, cost or availability. |
E.g., some standard Fastron inductors
|
NOOOOO!
|
The selection of the output capacitor is critical to LED ripple current, stability and LED life (*2*). The footprint allows SMD components of size 1206 up to 6.3mm AL caps.
Beside the voltage (>=6.3V) and capacitance (>=47u) rating of For elektrolytic capacitors, do not forget to consider:
For MLCCs (multi layer ceramic capacitors), choose >=100u, 6V3, X7R. Or better ;)
Do NOT use standard tantalum capacitors unless you know what you are doing!
Some measurements from a cheap setup:


(*2*) High power LEDs do indeed not like large current ripple (reduces life time -> less output).

Forget about "WATT", the most interesting specification is "LUMEN PER WATT".
Standard ExcoLight Basic configuration allows up to 500mA LED current (1-3W LEDs).
Nowadays (8/2010 ;-), CREE and Seoul (Acriche)
offer the most advanced (white) LEDs available.
But footprint supports:
There is no restriction on LED color, as long as the diffusion voltage is below 5V.
This allows two red, green, amber or yellow and one blue or white LED(s).
Two LEDs won't fit onto the board, you can attach them via a short(!, <<10cm), twisted(!) wire.

This way, a maximum of 126 ExcoLights can be connected to the loop. Each of them gets a dynamically allocated, unique (*1*) address (1-126) on power up. Addresses 0 and 127 are reserved for a wiring detection mechanism and a broadcast command.
(*1*) Actually, the restriction of an unique address can be overridden by software and hardware (bus topology). The software of the master control module may assign addresses of whatever value (e.g. 126 equal addresses), but a clever wiring can do the same without any bits or bytes (see below).
Communication is bidirectional, half-duplex and of a "host"-"device" type. The master control module (host) initiates all transfers. No module (device) sends any telegram on its own. Outgoing from the master control module (Q1/Q2), any sent command (TX FWD) sequentially passes all modules 1, 2, 3..., until it returns to its origin. An answer from any of the modules is sent to the same direction. Hence the two ends of the loop can be regarded as a "TX input", feeding module #1, and "RX output", coming out from the last module.
As an addition, stubs allow hardware-grouped modules, that all respond to the same address (see first figure: four times
module address 3, two times address 125). This allows connection of more than 126 ExcoLights (I doubt that this will
ever be put into practice ;-), but more important:
Multiple modules, namely all of those whose address is equal, will respond to the same command(s), which comes
in handy for areas of equal brightness and additionally reduces the traffic on the bus.
Note 1: Only inputs can be shared. Do not interconnect outputs!
Note 2: Answers from modules, whose output terminals are not connected (stubs), won't go anywhere.

The input "RXIN" is driven by an open collector "pull-only" output stage (previous module or MCM), with a software UART listening for any communication.
On power up, all modules start with an address of "0". The output of the PIC's internal comparator is turned off, hence only the first module is able to receive a command from the MCM.
After receiving its new, valid address, the output of the comparator is turned on (Note: The output
is inverted internally, thus the output signal is identically to the "-" input).
As of then, the comparator acts as a repeater and forwards any incoming telegram to the next module.
"CVref" is internally connected to the PIC's voltage reference module, which provides an adjustable
trigger level.
Diode D7 converts the comparator's push-pull output to a pull-type (open collector), as required by the next module.
With all of the above in mind, the "hardware-grouped" issue should be clear, now:
If modules are wired in parallel (stubs), the initial "NEW ADDRESS" command will be executed by all of them
(all started with address "0").

Instead of sending its messages out through the comparator, the software TX UART can be fed to pin "TXIN", which will then pull "RXIN" low via D4. Note: In this mode, the comparator's output is disabled. Otherwise the message would get sent in both directions.
The previous module's UART, now receives the telegram from the output terminal (initial transmission detected by interrupt on pin change "RXOUT") via D6. Instead of a hardware solution, like the automatically forwarded TX-mode, the software needs to take care about the "backward"-forwarding of the telegram (TX UART on pin TXIN, like described above). Backward RX mode should be avoided:
(*2*) Because all modules with the same address answer at the same time, the result is unpredictable.
Not every module of the "ExcoBus" series supports all commands.
ExcoLight Basic only supports commands, marked with a (*):
     CODE     COMMAND   |      BYTE  1       |      BYTE  2       |      BYTE  3
    +-----+-------------+--------------------+--------------------+--------------------+
  (*)0x00 | RESET       |        0xAA        |       0x55         |         X
  (*)0x01 | SET_ADDRESS | 0-127, new address |       0xAA         |       0x55
  (*)0x02 | SET_PWM     | 1-40 , PWM value   |       0x55         |       0xAA
  (*)0x03 | SET_123     | 0-255, CH1 value   | 0-255, CH2 value   | 0-255, CH3 value
     0x04 | SET_RGB     | 0-255, RED value   | 0-255, GREEN value | 0-255, BLUE value
  (*)0x05 | GET_REG     | 0-255, reg adr. 1  | 0-255, reg adr. 2  | 0-255, reg adr. 3
     0x06 | RAW_DATA    | 0-255, data byte 1 | 0-255, data byte 1 | 0-255, data byte 1
  (*)0x07 | SEND_ECMD   | 0-255, E-command   | 0-255, data byte 1 | 0-255, data byte 2
All other commands (including non existant E-commands will be ignored.
  v0.8
    - implemented 2nd address (for group addressing)
      Note: Byte with "new address" security code (0xAA) was replaced by 2nd address.
    - default PWM value is now 25
    - lowered COMM trigger level
    - new register: query 2nd address

  v0.7
    - implemented E-COMMANDs
    - Added feature "minimal on":
      LED will be turned on only if the commanded value is greater or equal "minimal on"
      Default is 8, can be reprogrammed with E-COMMAND and queried via GET_REG.

  v0.6
    - improved flash tweak (less current)
    - fixed bug: TX was low if COMP was turned off
    - TX comm implemented (modules answers)
    - GET_REG implemented

  v0.5
    - ...
COMMUNICATION:
==============

  - asynchronous serial interface
  - 4800,8O1
  - quiescent state is HIGH

PROTOCOL:
=========

  MASTER MODULE TO BUS:

        #BYTE 1, ADDRESS
      +---+---+---+---+---+---+---+---+
      | 1 | A6| A5| A4| A3| A2| A1| A0|
      +---+---+---+---+---+---+---+---+
         #BYTE 2, COMMAND + UPPER DATA BITS
        +---+---+---+---+---+---+---+---+
        | 0 |ANS|D17|D27|D37|CM2|CM1|CM0| <==  ANS = 0
        +---+---+---+---+---+---+---+---+
           #BYTE 3, DATA BYTE 1, D1x
          +---+---+---+---+---+---+---+---+
          | 0 |D16|D15|D14|D13|D12|D11|D10|
          +---+---+---+---+---+---+---+---+
             #BYTE 4, DATA BYTE 2, D2x
            +---+---+---+---+---+---+---+---+
            | 0 |D26|D25|D24|D23|D22|D21|D20|
            +---+---+---+---+---+---+---+---+
               #BYTE 5, DATA BYTE 3, D3x
              +---+---+---+---+---+---+---+---+
              | 0 |D36|D35|D34|D33|D32|D31|D30|
              +---+---+---+---+---+---+---+---+

  For firmware version less or equal to V0.8, allow 40ms delay between two packets.


  BUS (MODULE) TO MASTER MODULE:

        #BYTE 1, OWN ADDRESS
      +---+---+---+---+---+---+---+---+
      | 1 | A6| A5| A4| A3| A2| A1| A0|
      +---+---+---+---+---+---+---+---+
         #BYTE 2, COMMAND + UPPER DATA BITS
        +---+---+---+---+---+---+---+---+
        | 0 |ANS|D17|D27|D37|CM2|CM1|CM0| <==  ANS = 1
        +---+---+---+---+---+---+---+---+
           #BYTE 3, DATA BYTE 1, D1x
          +---+---+---+---+---+---+---+---+
          | 0 |D16|D15|D14|D13|D12|D11|D10|
          +---+---+---+---+---+---+---+---+
             #BYTE 4, DATA BYTE 2, D2x
            +---+---+---+---+---+---+---+---+
            | 0 |D26|D25|D24|D23|D22|D21|D20|
            +---+---+---+---+---+---+---+---+
               #BYTE 5, DATA BYTE 3, D3x
              +---+---+---+---+---+---+---+---+
              | 0 |D36|D35|D34|D33|D32|D31|D30|
              +---+---+---+---+---+---+---+---+


COMMANDS (CM0-CM2):
===================
  Commands marked with (A) will initiate a module answer.
  Commands marked with (B) might initiate a module answer.


         CM0-CM2        |      D10-D17       |      D20-D27       |      D30-D37
     CODE     COMMAND   |      BYTE  1       |      BYTE  2       |      BYTE  3
    +-----+-------------+--------------------+--------------------+--------------------+
     0x00 | RESET       |        0xAA        |       0x55         |         X
     0x01 | SET_ADDRESS | 0-127, 1st address | 0-127, 2nd address |       0x55
     0x02 | SET_PWM     | 1-40 , PWM value   |       0x55         |       0xAA
     0x03 | SET_123     | 0-255, CH1 value   | 0-255, CH2 value   | 0-255, CH3 value
     0x04 | SET_RGB     | 0-255, RED value   | 0-255, GREEN value | 0-255, BLUE value
  (A)0x05 | GET_REG     | 0-255, reg adr. 1  | 0-255, reg adr. 2  | 0-255, reg adr. 3
     0x06 | RAW_DATA    | 0-255, data byte 1 | 0-255, data byte 1 | 0-255, data byte 1
  (B)0x07 | SEND_ECMD   | 0-255, E-command   | 0-255, data byte 1 | 0-255, data byte 2

            RESET       -> isolator open, address 0, all primary channels off, default PWM
                           Module will output a short flash pulse.
            SET_ADDRESS -> Set new module address. On power up, every module starts with "0".
                           Usually used as: To module "0", new address "n".
                           SET_ADDRESS will make the module output a short flash pulse.
                           Can be used as "Single Flash Mode": To module "2", new address "2".
                           "2nd address" provides an easy way of talking to more than one module
                           at once ("group addressing"). To maintain the value of the 2nd address,
                           writing "0" to it, will have no effect.
            SET_PWM     -> set new PWM value (DANGEROUS!)
            SET_123     -> set values of primary channels 1-3          LIGHT MODULES, ONLY!
            SET_RGB     -> set values of primary channels R, G and B   LIGHT MODULES, ONLY!
            GET_REG     -> query values of internal registers
            RAW_DATA    -> send raw data bytes to module (module dependenttext, states, ...)
            SEND_ECMD   -> send an enhanced command to the moduletwo data bytes are available


  MODULE ANSWERS to primary commands:

     ON CMD   COMMAND     |      BYTE  1       |      BYTE  2       |      BYTE  3
    +-------+-------------+--------------------+--------------------+--------------------+
      0x05  | GET_REG     |  value register 1  |  value register 2  |  value register 3


  E-COMMANDS (as argument to SEND_ECMD above)
  Commands marked with (A) will initiate a module answer.

     CODE     COMMAND   |      DBYTE  1      |      DBYTE  2      | supported by module
    +-----+-------------+--------------------+--------------------+-------------------------------
     0x00 | SET_MIN_ON  | 0-255, minimal on  |         X          | Basic
     0x01 |             |                    |                    |
     0x02 |             |                    |                    |
     0x03 |             |                    |                    |
     0x04 |             |                    |                    |
     0x05 |             |                    |                    |
     0x06 |             |                    |                    |
     0x07 |             |                    |                    |
     ...  |             |                    |                    |
     0xFF |             |                    |                    |

            SET_MIN_ON  -> Value at which the LED is turned on (minimal trigger value).
                           Will be activated upon next SET_PWM or SET_123/RGB command.


  MODULE ANSWERS to enhanced commands:

     ON CMD   COMMAND     |      BYTE  1       |      BYTE  2       |      BYTE  3
    +-------+-------------+--------------------+--------------------+--------------------+
            |             |                    |                    |


REGISTERS:
==========
  For use with GET_REG.
  Availability of registers depends on module type.
  Commands setting or reading invalid or not existant registers will be ignored.

  COMMON REGISTER SET:

     CODE    REGISTER     DESCRIPTION
    +-----+-------------+-----------------------------------------+
     0x00 | TYPE        | query module type
     0x01 | PWM         | get current PWM value
     0x02 | CH 1 VALUE  | get current channel 1 value
     0x03 | CH 2 VALUE  | get current channel 2 value
     0x04 | CH 3 VALUE  | get current channel 3 value
     0x05 | CH R VALUE  | get current channel RED value
     0x06 | CH G VALUE  | get current channel GREEN value
     0x07 | CH B VALUE  | get current channel BLUE value
     0x08 | REVISION    | query module revision
     0x09 | MIN_ON_TIME | query minimal on time
     0x0A | 2nd ADDRESS | query 2nd address


TYPES:
======
   CODE   DESCRIPTION
  +-----+-------------------------------------------------------+
   0x01 | ExcoLight Basic
   0x02 | ExcoLight Color
   0x03 | ExcoSens
   0x04 | ExcoTrans

Note: This requires a level converter, RS-232 <-> CMOS (MAX232, FTDI, ...) and open collector out- and inputs!
TX needs a Schottky diode: CONV --|<|-- ExcoLight
RX needs a 30k pull-up to Vcc of the level converter (if not already present).
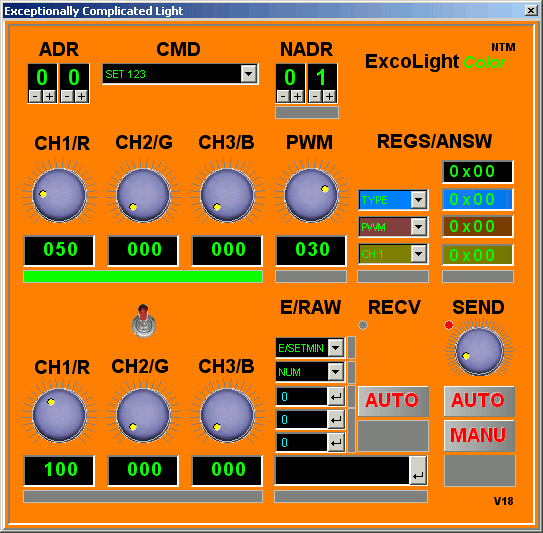
This little test and debug application was developed (...) with Profilab.
Profilab project files as well as a compiled version are available in the download section.
what an idiotic idea...
|
really ;)
|

|

|
ExcoLight V2.2:
Includes:
- schematic (PDF)
- placement (PDF)
- layout, Eagle (BRD)
- firmware, 16HV616 (HEX)
- software, PC (PRJ/EXE)
DOWNLOAD: firmware, 16HV616 FW; V0.8
DOWNLOAD: hardware HW; V2.2
DOWNLOAD: software, PC; test and debug interface; Profilab SW; V1.9
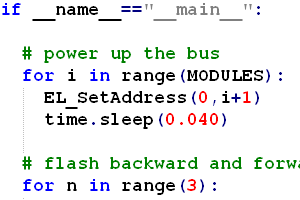
DOWNLOAD: Python control example
ASkr/MGas 03/2010: initial public prototype
ASkr/MGas 05/2010: initial public release (V1.0)
ASkr 06/2010: HW updated to V2.0
ASkr 06/2010: PC updated to V0.9
ASkr 08/2010: PC updated to V1.8; FW updated to V0.7; HW now V2.2 (fixed typos, added text, less components)
ASkr 09/2010: added Python script and a stupid video; FW V0.8; SW V1.9


