"asDataView" is completely written in Python. Change the code whenever you like and wherever you
are (assuming that Python is installed).
As usual, this is not a complete, 100% proof application. It does not come with fancy menus,
options for loading and saving settings. All of this has to be done directly in the
parameter section of the Python code.
Once you changed a few settings, like
|
Setup
Open "asDataView_Vxy.pyw" with your favourite text editor and look out for
the PARAMETER section (somewhere around line 170):
  #---------------------------------------------------------------------------------------
  # PARAMETERS:
  #
  pSER_COMPORT = 17                  # serial comm port number (COM1 = 1, COM2 = 2, ...)
  pDAT_BAUDRATE = 1000000            # baud rate in bits/s
  pSER_INBUF = 8192                  # serial buffer (8192 is a nice, default value even...
  pDAT_SRATE = 100                   # initial sampling rate guess; use key 't' to update...
  pDAT_SRATEUPDATETIME = 3           # update time interval of sampling rate (if enabled...
  pDAT_CHANNELS = 2                  # number of channels

  # If you need more than 8 channels, just increase the length of the three following lists:
  pDAT_RESOLS = [  # resolution of data channel; valid: 2**1 ... 2**16
                  2**12,             # CH1
                  2**12,             # CH2
                  ...
                  2**8,              # CH8
                ]
  pDAT_UREFS  = [ # reference value (use '1' for RAW values)
                  3.3,               # CH1
                  3.3,               # CH2
                  ...
                  5.0,               # CH8
                ]
  pDAT_COLORS = [ # channel colors
                  (000,000,000),     # CH1
                  (000,255,000),     # CH2
                  ...
                  (000,000,000)      # CH8
                ]
|
At least these variables and arrays need to be changed:
- pSER_COMPORT
-
The number of the COM port, where your data is coming from.
If unsure, open the Windows device manager or type "devmgmt.msc" on any
console or inside the "Start -> Execute" field.
- pDAT_BAUDRATE
-
Enter the baud rate. This needs to match the parameters of your hardware.
Any value your hardware (and the Windows driver) accepts is ok.
E.g.: 300, 4800, 19200, 115200, 1000000, 3000000, ...
- pDAT_CHANNELS
-
Specify the number of channels that are transmitted.
Always use less than 100 channels (1..99)!
- pDAT_RESOLS
-
For each of the channels, define their bit widths. Valid values are 2**1
(one bit) up to 2**16 (16 bit).
- pDAT_UREFS
-
If you like to see RAW values (e.g. 0..255 for an 8 bit channel), just enter
a "1". In all other cases, the displayed or saved values will refer to this
reference voltage:
VALUE = (UREF / RESOL) * RAW
Additionally the channels colors can be changed via "pDAT_COLORS" by simply entering
different (R,G,B) values.
Keep your hands off the other stuff, unless you know what you are changing...
After changing all parameters, it is a good practice to save your new setup with a
new file name. This way, you can have multiple applications for completely different
purposes, which will all start with a known behaviour (except for the COM port, which
might require a different setting on another PC).
===
Hint:
The annoying background color can be changed via "pWIN_BGCOLORSAMP" ;-)
Usage
the giant menu
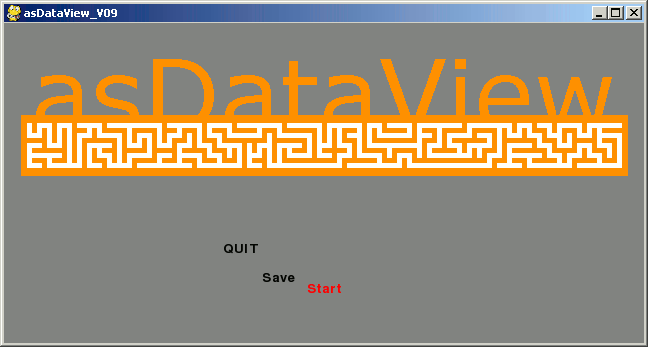
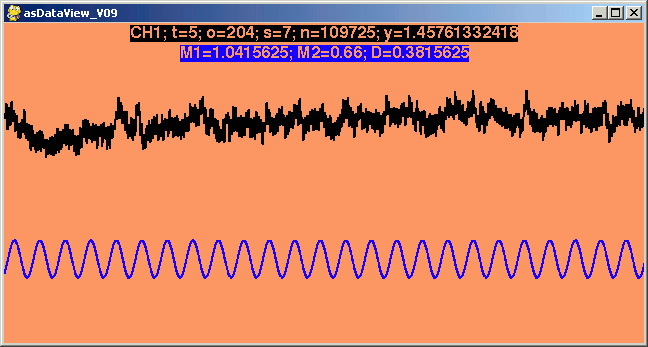
two channels in action
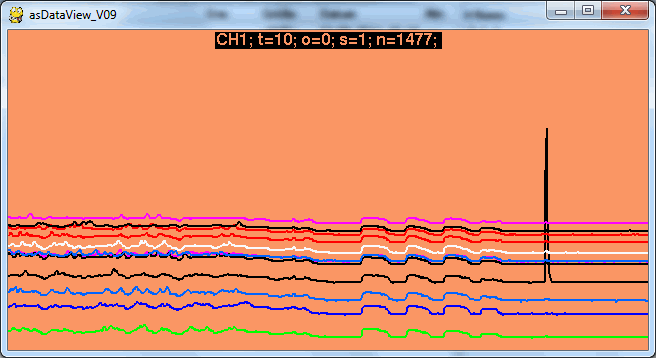
another view
Once the acquisition is started, the waveform display operates like an oscilloscope
in roll-mode with peak-detect display (*1*).
Hitting LEFT or RIGHT changes the "time base" of the window width (1..20s).
Because the application knows nothing about the real sampling rate, which is required to
maintain a constant time base, it can be specified via:
- the variable "pDAT_SRATE", inside the source
- or auto-detected by hitting 't'.
If you press 't', the system counts the number of incoming packets (within the time
specified by "pDAT_SRATEUPDATETIME", in seconds) and updates the time base according
to this guess.
The calculated sampling rate is displayed in the info line ("sr = ") until this feature
is turned off. Hitting 'u' toggles the sampling rate unit to be either "samples/s" or
"time/sample" (*2*).
TAB or CTRL-TAB browses through channels, forward or backward. The info line on top of the screen will change its color
according to the selected channel.
'w' will turn the selected waveform display on or off (data is always recorded).
If too much channels are causing confusion, 'o' will turn off all waveforms, except
the selected one. Finally, 'a' will again turn on all channels.
To get rid of previously recorded data, hit 'r'. This is useful to reduce the recorded
waveform length to a minimum. Notice that this will delete all data, not only
data of the selected channel!
'v' will turn on/off the "mouse cursor markers". Beside the "y =" display in the info line,
which shows the value at cursor position, the left and right mouse buttons can be used
to set two markers. Additionally, the difference M1-M2 is displayed.
On slow computers, high sampling rates, long display times and many channels can cause
buffer under-runs (keep in mind that Python is a scripting language, hence it is decades
slower than a native C/C++ app;).
To overcome that, 'w' toggles the visibility of the selected waveform. If this still does
help and your system is really slow, hit 'SPACE'.
'SPACE' will stop updating the waveforms. This will...
- ... reduce system load on even slower computers.
- ... give you a chance to place the mouse markers.
Notice that hitting 'SPACE' does not stop the acquisition, only the display will
not get updated.
If you really need to see all values, but your system is too slow, some other options
are available:
- reduce the window size
- reduce the time base (less data to draw)
- use '.' and ',' to increase or decrease the display updates
Finally, 'ESC' stops sampling and returns to the main menu.
Do not forget to save your recorded data ;-)
Hitting 'Save' will create one file per channel. The naming convention is
"ch<nn>.dat".
<nn> is nothing else but the channel number.
The files can directly be loaded into Scilab, Octave or Matlab.
Right now (V0.9), the files do not contain any time stamp. This might change
in future versions...
===
(*1*) Yes, every single sample is brought on screen.
(*2*) Can be used to determine FW timing, if the sending routine is inside a loop.
===
HOTKEYS:
  ESC   -  close serial interface and stop sampling
  TAB   -  channel selection upwards, hold left CTRL key to reverse direction
  r     -  reset data (delete all previously acquired samples)
  w     -  toggle selected waveform visibility
  o     -  turn on selected waveform and hide all other
  a     -  turn on all waveforms
  .     -  increase display update skips by 100 (data gets drawn only every n loop)
  ,     -  decrease display update skips by 100 (data gets drawn only every n loop)
  i     -  toggle info message
  t     -  real-time sampling rate update and display
  u     -  toggle sampling rate display unit (samples/s <-> time/sample);
  v     -  toggle value display at cursor and marker (units depend on pDAT_UREFS)
  MB1/3 -  mouse buttons set value markers on current channel (best used after stopped)
  SPACE -  toggle (stop/start) waveform and background updates update
  UP    -  increase waveform display offset
  DOWN  -  decrease waveform display offset
  LEFT  -  decrease display time by 1s
  RIGHT -  increase display time by 1s
  0     -  set waveform display scale factor to 1
  8     -  decrease waveform display scale factor by 1
  9     -  increase waveform display scale factor by 1
|
Protocol/Interface
Although any serial interface can be used, I highly recommend USB UARTs, like
FTDI, MCP2200, etc...
These devices offer much higher baud rates. Even if the Python app might be too slow
to capture a real-time 1MBit/s stream (and it was not developed for such high
transfer rates), sending short burst packets at high speed will reduce the impact
of the sending routine in your firmware.
Example: Sending 10 bytes at 115k2 will take ~870us. At 1MBit/s, you can do the same
within 100us...
The protocol consists of a "start of packet" section (DLE sequence 0x10, 0x02), followed
by an arbitrary amount of data bytes.
Because two consecutive data byte containing values 0x10 and 0x02 would trigger another
packet start, any data byte containing a 0x10 needs to be repeated a second time.
Notice that there is no "packet end" marker.
   +------+------+------+------+------+------+------+------+------+------+
   | 0x10 | 0x02 |  B1  |  B2  |  B3  |  B4  |  Bn  | 0x10 | 0x02 |  B1  |
   +------+------+------+------+------+------+------+------+------+------+
   |<-- START -->|  CH1   ...                       |<-- START -->|
|
Every packet starts with a 2 byte header (0x10, 0x02), followed by an
arbitrary length of user data.
Channel resolution can be anything in between 1..16 bits, hence transmitting
a single channel requires 1 byte for resolutions of 1..8 bits, or 2 bytes for
a resolution for 9..16 bits.
In case of the latter, the low byte is transmitted first:
   data to send = 0x1234
   +------+------+------+------+...
   | 0x10 | 0x02 | 0x34 | 0x12 |...
   +------+------+------+------+...
   |<-- START -->|<--- CH1 --->|...
|
Example, 3 x 8 bit channels:
     CH1 data = 0xAA
     CH2 data = 0xBB
     CH3 data = 0xCC
   +------+------+------+------+------+------+------+-...
   | 0x10 | 0x02 | 0xAA | 0xBB | 0xCC | 0x10 | 0x02 | ...
   +------+------+------+------+------+------+------+-...
   |<-- START -->|  CH1 |  CH2 |  CH3 |<-- START -->| ...
|
And remember: Every data byte containing a 0x10 needs to be repeated a second time.
Example, 3 x 8 bit channels:
     CH1 data = 0xAA
     CH2 data = 0x10
     CH3 data = 0xCC
   +------+------+------+------+------+------+------+------+-...
   | 0x10 | 0x02 | 0xAA | 0x10 | 0x10 | 0xCC | 0x10 | 0x02 | ...
   +------+------+------+------+------+------+------+------+-...
   |<-- START -->|  CH1 |     CH2     |  CH3 |<-- START -->| ...
|
Example, 1 x 16 and 2 x 8 bit channels:
     CH1 data = 0xAABB
     CH2 data = 0xCC
     CH3 data = 0xDD
   +------+------+------+------+------+------+------+------+-...
   | 0x10 | 0x02 | 0xBB | 0xAA | 0xCC | 0xDD | 0x10 | 0x02 | ...
   +------+------+------+------+------+------+------+------+-...
   |<-- START -->|     CH1     |  CH2 |  CH3 |<-- START -->| ...
|
Example, 1 x 16 and 2 x 8 bit channels ("worst case 0x10 scenario"):
    CH1 data = 0x1010
    CH2 data = 0x10
    CH3 data = 0x10
  +------+------+------+------+------+------+------+------+------+------+------+------+-...
  | 0x10 | 0x02 | 0x10 | 0x10 | 0x10 | 0x10 | 0x10 | 0x10 | 0x10 | 0x10 | 0x10 | 0x02 | ...
  +------+------+------+------+------+------+------+------+------+------+------+------+-...
  |<-- START -->|            CH1            |     CH2     |     CH3     |<-- START -->| ...
|
Any channel with a bit width smaller than 8 bit still requires a full byte, the
same applies to 9..15 bit channels, hence 2 full bytes are required (*1*).
===
(*1*) Shifting around an arbitrary number of bits consumes too much time.
Known Bugs
-
If the mouse is inside the "asDataView" window and applications are switched via
ALT-TAB (XP) or WINDOWS-TAB (Win7), the mouse is stuck until "asDataView" gets
the focus again.
-
The offset function ('UP'/'DOWN') gets a little tricky if the waveform is scaled ('8'/'9').
|
Just some excerpts from the last two or three projects.
Unfortunately these were:
Well, maybe I add more (some day)...
:-P
Propeller
SPIN
Assuming you have a function "tx()", that transmits a byte and an area of memory ("addr"),
containing the data to send:
  PUB txpacket(addr,len) | i,ch
  '' Send a packet, starting at memory address <addr>.
  '' The length is determined by <len> (in bytes).
    tx($10)
    tx($02)
    repeat i from 0 to len-1
      ch:=byte[addr+i]
      tx(ch)
      if ch==$10
        tx($10)
|
PASM
"SendVDat", in the example below, does not send a memory area, but 4 bytes from
one 32 bit double word (or long).
Assuming your byte-sending routine uses "txbuf" as send buffer:
  '--------------------------------------------------------------------
  '--- SendVDat -------------------------------------------------------
  SendVDat
                          mov     txbuf,#$10
                          call    #SendByte
                          mov     txbuf,#$02
                          call    #SendByte

                          mov     vi,#4            ' send 4 bytes
  :bytes
                          mov     txbuf,vDat
                          and     txbuf,msk8b
                          call    #SendByte

                          cmp     txbuf,#$10 wz    ' 0x10? -> repeat!
                  if_z    call    #SendByte

                          shr     vDat,#8

                          djnz    vi,#:bytes

  SendVDat_ret            ret
|
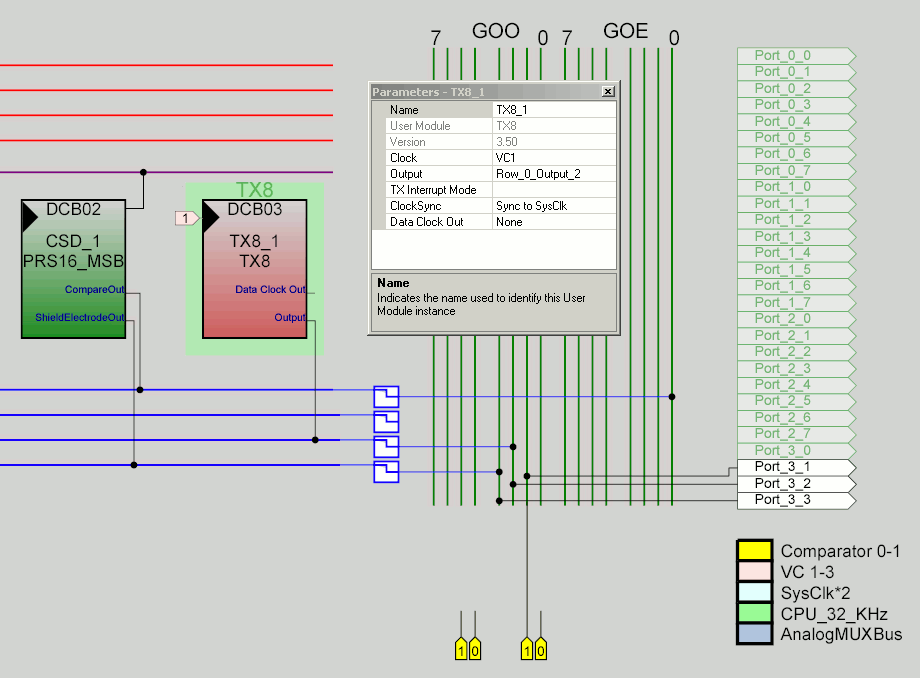
PSoC
hardware setup
This works ways faster and better than Cypress' I2C solution...
Place a 'TX8' block and route the output to any available pin.
Assuming the 'SysClk' is operating at 24MHz, connect the 'TX8' clock input to VC1.
Because other automatically generated blocks or resources often re-program all internal
clocks ('CPU_Clock' and 'VC1..3', especially the CSD interface will do this), we'll simply
do the same ;)
First initialization (once):
  TX8_1_DisableInt();
  TX8_1_Start(TX8_PARITY_NONE);
|
A simple, blocking send routine:
  void asDbgSendbyte( BYTE dat )
  {
    TX8_1_PutChar(dat);
    while( ! (TX8_1_bReadTxStatus() & TX8_TX_COMPLETE)  )
    {;}
  }
|
For debug data, the most simple storage solution indeed is a global array (or a struct/union
if you need to transfer different sized data types):
Somewhere inside the code...
This example stores some raw, >8 bit CapSense button values.
Remember: Low byte first!
  for( i=0; i < gNumButtons; i++ )
  {
    ...
    ... CapSense acquisition
    ...

    asDbg[i*2+0] =  CSD_1_waSnsResult[i]       & 0xff;
    asDbg[i*2+1] = (CSD_1_waSnsResult[i] >> 8) & 0xff;

    ...
    ... whatever...
    ...
  }
|
The part of interest:
Assuming 'SysClk' is set to 24MHz, we
- disable all interrupts,
- reprogram VC1 to 8MHz,
- send all debug data,
- restore VC1 to its previous value
- and finally re-enable interrupts.
Notice that reprogramming might affect othe behaviour of other blocks!
  void asDbgSend( BYTE len )
  {
    BYTE i;
    BYTE oscold, oscnew;
    BYTE *p =(BYTE *)&asDbg;

    M8C_DisableGInt;

    // set VC1 to 8MHz -> UART operates on 1/8 -> 1MBit/s
    oscold = OSC_CR1;
    oscnew = oscold & 0b00101111;
    oscnew |= 0b00100000;
    OSC_CR1 = oscnew;  // one atomic write

    asDbgSendbyte(0x10);
    asDbgSendbyte(0x02);

    for(i=0;i<len;i++)
    {
      asDbgSendbyte(*p);
      if(*p == 0x10)
        asDbgSendbyte(0x10);
      p++;
    }

    OSC_CR1 = oscold;
    M8C_EnableGInt;
  }
|
Or an universal solution:
  void asDbgSend( BYTE *p, BYTE len )
  {
    ...
  }
|
Additionally, one can save one byte by either:
- combining 'i' and 'oscnew'
- or removing 'i' and counting down 'len'.
But this is nitpicking, because the default ImageCraft compiler produces horrible
code anyway...
|

